When it comes to building web applications, React has been at the forefront for a while now, and its adoption continues to grow. Among the most common approaches to building web applications with React, Next.js stands out as one of the most preferred options.
Next.js has also been in the limelight since last year when they released their biggest update to the framework ever with the app router. This introduces a new routing architecture that uses nested layouts and is closely integrated with React Server Components and Suspense.
But Next.js wasn’t the first React framework to implement this layout-based routing. Almost a year before Next.js publicly launched the app router, another framework called Remix launched it with its public v1. Remix is built by the people behind React Router, the most popular client-side router for React applications.
The idea behind Remix was simple, it is an edge-first full-stack framework that encouraged building websites with the standard web APIs like Request, Response, FormData, etc., and had features that allowed creating nested layouts that load data in parallel, handle race conditions for you, and make you build your websites in such a way that they work even before JavaScript has started to load. Their MO was that you get better at web fundamentals as you get better at Remix.
I really admired the philosophy behind Remix and was really excited about the direction Next.js was moving forward with React Server Components. So I thought what better way would be to learn about both of them than to build a complete full-stack app. Therefore, I created one of my favorite websites X (formerly Twitter), incorporating the majority of the core functionalities from both frameworks. This blog post focuses on the lessons I learned, the aspects that one framework should adopt from the other, and my personal experiences and opinions while developing the app in both frameworks.
We will be comparing them in different sections, which include Layouts, Data Fetching, Streaming, Data Mutations, Infinite Loading, and some other features.
Layout
When it comes to layout, I like how both frameworks went pretty much the same route by allowing you to create shared nested layouts that persist between navigations.
The majority of web apps we build today, in one way or another, have a layout that is shared by multiple URLs grouped together. Whether it be a sidebar in a documentation or tabs in an analytics dashboard, shared layouts are everywhere, and Twitter Clone was not any different. In fact, a few of the pages had a situation where one layout was nested in another. The user profile page had a sidebar that persists across almost all routes and also had tabs where each tab had its own URL.
Now if you have built layouts like this with Next.js 12 or earlier, you know how complicated and messy they used to be where you had to create functions on your components and wrap them in those functions in _app.tsx. This got further complicated if the layout required some data that was supposed to be fetched on the server. You had to duplicate the data fetching logic required by the layout in all your page’s getServerSideProps that shared those layouts.
But now, with both Remix and Next.js 13, you can rely on the framework's file-system based router that handles creating layouts for you.
Remix
With Remix, in their new v2 version, you can use the dot delimiter to create a slash (/) in the URL. For example, a file called app/routes/invoice.new.tsx would be matched to the route /invoice/new, and a route named app/routes/invoice/$id.tsx would be matched to a route /invoice/{id}, where id represents the invoice ID.
If your invoice URLs share a common layout, you can create an invoice.tsx file that contains the layout. In this file, you can add the <Outlet /> component where the pages that share the layout are supposed to be, which will result in both the /invoices/new and /invoices/{id} pages sharing that layout.
There also might be some cases where you need a common layout but don’t have a shared URL structure. Remix has a solution for that as well if you create a route with the prefix _, that route is not included in the URL. These routes are called Pathless Routes.
All of these features combined enable you to compose and create powerful nested layouts, such as the one for user profile in the Twitter Clone app.
Apart from the sidebar shared by almost all pages. The user profile page also required a separate layout because it included tabs for tweets, replies, and likes, which would have been separate pages and hence standalone URLs of their own. This is what the file structure for the Remix app looks like:
app/
  routes/
    _base.tsx
    _base._index.tsx -->   /
    _base.$username.tsx
    _base.$username._index.tsx -->   /{username}
    _base.$username.replies.tsx -->   /{username}/replies
    _base.$username.likes.tsx -->   /{username}/likes
    _base.status.$id.tsx -->   /status/{id}
    _auth.tsx
    _auth.signin.tsx -->   /signin
    _auth.signup.tsx -->   /signup
Here _base.tsx is the main layout which contains the sidebar shared by most pages. Then there’s the _base.$username.tsx layout, which is a nested layout within the base layout and contains the profile header and the tabs for tweets, replies, and likes. The ._index.tsx represents / URL for the given layout.
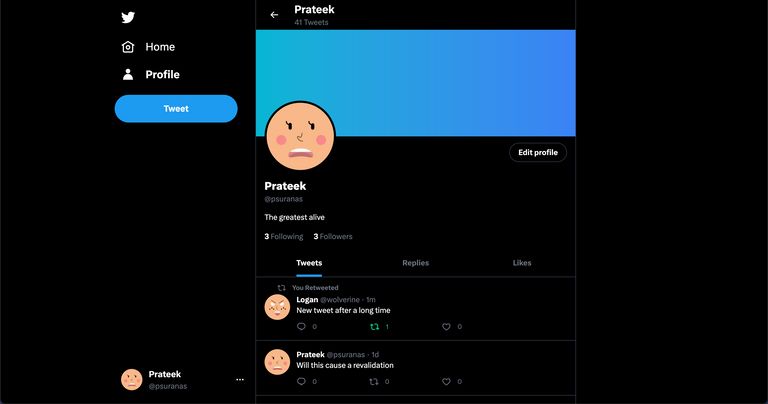
The following is a representation of these routes work for the user profile page in the app:

You can also check the code for the routes on GitHub and learn more about the route file naming conventions in the Remix docs and via this awesome visualization.
Next.js
The layout system is pretty much similar in the app directory of Next.js 13 as well; the main difference is you use directories to represent URLs and files inside the directories, like layout.tsx for layouts and page.tsx to make that route publicly accessible and use React’s children prop in layouts to populate the child layouts or pages.
In fact, Next.js 13 goes even a step further, allowing you to create separate files that define the loading state with loading.tsx and error states with error.tsx for every route segment. We will discuss these in more detail in the upcoming sections.
Creating layouts that don’t share a common URL is also pretty similar to Remix, and the only difference is instead of creating a file starting with _, we create a directory with the folder name in parenthesis, like (folderName). These directories are called route groups in Next.js. Dynamic segments of the URL are created by wrapping the folder’s name in square brackets, like [id] or [username].
This is what the file structure looks like for the Next.js 13 Twitter clone routes:
app/
(base)/
[username]/
likes/
page.tsx --> /{username}/likes
replies/
page.tsx --> /{username}/replies
layout.tsx
page.tsx --> /{username}
status/[id]/
page.tsx --> /status/{id}
layout.tsx
page.tsx --> /
(auth)
signin/
page.tsx --> /signin
signup/
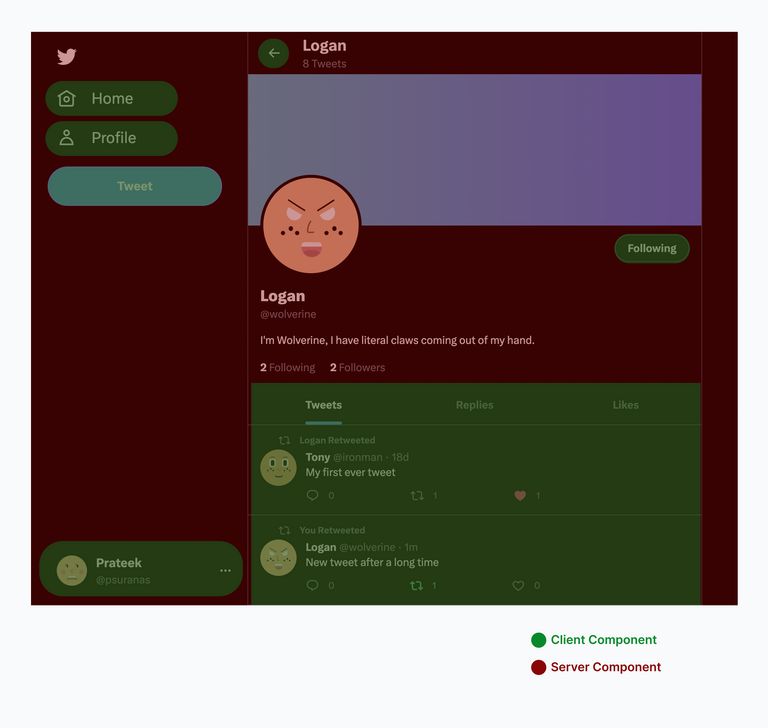
page.tsx --> /signupAnd the following image is how these routes render the user profile page:

You can also check out the code on GitHub and read more about layouts and pages in the Next.js docs.
Bottom line
Now if we compare the routing mechanisms of both these frameworks, I really like the Remix one, because of how intuitive it is, and you can tell what route the file/layout represents just by looking at it. Whereas with Next.js, you end up with a Spaghetti of page.tsx and layout.tsx, and you have to look through your directory structure to figure out what URL a given page would be rendered on.
But having said that, I also understand why Next.js did that because it's not just page and layouts that live in those directories but also other stuff like notFound.tsx , loading.tsx , error.tsx etc., which help you define your loading/error states for each of your route segments. Also another benefit is that you can colocate your components with your routes.
Either way, I love that both of the frameworks have chosen pretty much the same direction for file-system-based routing, and it feels like the right way to go.
Data Fetching
Data fetching is a crucial part of modern web applications. At the beginning, most React apps used to be client side rendered where the server just sends an empty index.html file with the relevant JavaScript bundle in a <script /> tag. This resulted in blank pages initially while the browser downloads and executes the JavaScript, React initializes and starts fetching data for rendering your components. This would significantly impact performance on low-powered devices or devices with poor internet connections.
Next.js and Gatsby primarily changed that when they simplified fetching data on the server and/or at the build time for React applications allowing pre-rendering the initial HTML. So now the users have the initial UI ready as your website first loads. Although they still have to wait for the JavaScript to be downloaded and React to be hydrated before they can start interacting.
Now Next.js 13 and Remix both take this one step further. Next.js with React Server components and Remix with their loaders and parallel data fetching.
Remix
When it comes to Remix, the way you fetch data is in loaders where each route can define a loader function that provides relevant data to the route when rendering. Loaders are only run on the server.
Here is an example of a loader from the Remix Twitter Clone, which is used in the _base.tsx layout:
export const loader = async ({ request }: LoaderFunctionArgs) => {
  const currentLoggedInUser = await getCurrentLoggedInUser(request);
  return json({ user: currentLoggedInUser }, { status: 200 });
};

export default export default function RootLayout() {
  const { user } = useLoaderData<typeof loader>();
  ....
}
The loaders get the Fetch Request object as an argument, which allows them to read things like headers, cookies, etc., and the return type of loaders is always the Fetch Response. Remix provides some wrappers on top of the Response object, like json, redirect, etc., that let you return specific types of responses with relevant status codes. You can then use the loader data in your components with the useLoaderData hook.
With Remix, since you can define loaders in each part of the route segment, including layouts, it is able to load the data for all the route segments in parallel instead of fetching data in a waterfall if fetching data on the browser. This is best illustrated with this illustration on their landing page:
And this is how the Network graph looks for the Remix Twitter Clone as well:

Secondly, loaders are not just used for rendering pages on the server. Since their response is just an HTTP Fetch Response, Remix also calls the loaders via fetch in the browser, on navigations, or for revalidations.
Next.js
With the introduction of the app directory in Next.js 13, Next.js has pivoted away from defining the server-only data fetching logic that is present in getServerSideProps / getStaticProps in only the page files to React Server components (RSCs).
RSCs are a broad topic, and there are a lot of other problems they solve apart from just data fetching on the server that deserves a separate blog of its own (I actually covered this in much more detail in my Future of Rendering in React blog).
In a nutshell, Server Components are a new paradigm in React. They are components that only render on the server and, unlike traditional server-side rendering in React, are never hydrated on the client. They have a lot of benefits which include:
- Data fetching and security: Since Server components only ever run on the server, you can include server-only secrets and API calls directly in your React Server Components without worrying about ever exposing them to the client.
- Deterministic Bundle Sizes: The dependencies that would have earlier impacted the client's JavaScript bundle sizes would now never be downloaded to the client if they are only ever used inside a Server Component. (A good example of this would be a markdown parser whose JavaScript earlier would have needed to be downloaded to hydrate the page)
For the parts that need interactivity, you need to create Client Components. Unlike their name, Client Components are rendered on the server as well, but they follow the usual Server Side rendering pipeline where they have to be hydrated by downloading and executing the relevant JavaScript for them on the client side.
Server Components are not a silver bullet and have some limitations, which include:
- Since they only run on the server and are never hydrated, they cannot contain any interactive pieces of UI, so things like
useState,useEffect, event handlers, and browser-only APIs won’t work. Instead, you are now supposed to use Client Components wherever you need interactivity in your component tree. - You cannot import and use a Server Component inside a Client Component. Since Server Components can only be rendered on the server, we need to know all the Server Components in the tree on the server itself. Although there are ways you can interleave them together.
Inside the app directory, all components by default are Server Components, and if you want to add interactivity, you need to add client components inside the component tree. Client Components are created by adding the 'use client' directive at the top of the file. Also, Server and Client Components can never be in the same file.
Again here is an example of the same base layout that we saw in Remix as a Server Component in Next.js:
export default async function BaseLayout({
  children,
}: {
  children: React.ReactNode;
}) {
  const user = await getCurrentLoggedInUser();
  const isLoggedIn = !!user;

  return (
    ...
  );
};
Since they are rendered on the server, Server Components can return Promises. This allows you just to await data inside your components and then use that data while rendering.
Next.js also provides you with helpers like headers, cookies, redirect, revalidatePath, etc., that allow you to access request data on the server side and take server-only actions. The getCurrentLoggedInUser method here actually uses the cookies to fetch the details of the currently logged-in user from the database.
This is a really game-changing feature where possibilities are limitless because now, you can not only read data from your database in a declarative way directly inside your React components but also do it at any level of the component tree instead of just route segments as long as you are doing it inside a Server Component.
The recommended way to compose your applications in Next.js 13 is by keeping the Client Components at the leaves of your component tree, only wherever you need interactivity, state, or browser-only APIs. Here is how the composition is distributed for the user profile page in the Next.js Twitter Clone:
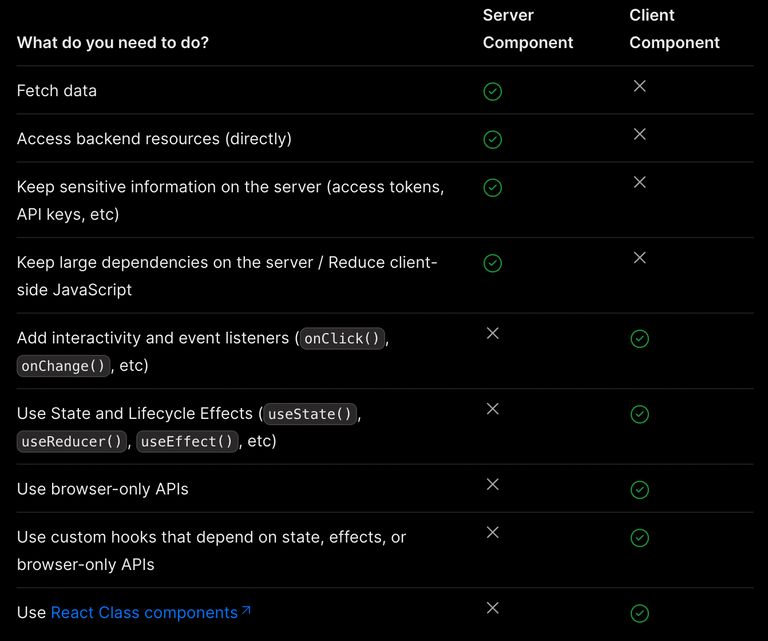
Next.js rendering docs also has this table that can help you decide when to use Client or Server Components.
Bottom line
Although I appreciate the way Remix has built a powerful API using loaders, which allows for parallel data fetching for child routes and easy revalidations, and I also like the fact that loaders always return a Fetch Response, but React Server Components still feel like the right to go.
In addition to other benefits, such as deterministic bundle size, React Server Components also provide a great developer experience (DX). They allow you to compose your component tree in a way that fetches data exactly where it belongs, rather than only in route segments.
Remix has also acknowledged the benefits RSCs bring to the table, and they, too, plan to integrate React Server Components in the future.
One another caveat with loaders is that you define your loaders in the same file that your components go to. While the compiler does a good job in segregating between client and server bundles, but can still lead to accidental exposure of server-only secret or shipping server-only bundles to the client, Remix also has a whole doc with the gotchas that you need to be aware of when importing modules in your Route segments. And yes, Next.js prior to the app directory also suffers from the same caveats with getServerSideProps.
Lastly, Server Components are also suffer from some problems of their own. By default, if you just fetch data in your Server Components, data will be fetched sequentially in a waterfall along the Server Component tree. Although there are ways to parallelize it, the solutions are far from perfect.
Streaming
With React 18, you can use Streaming and Suspense, which allows you to progressively render and incrementally stream rendered units of the UI to the client.
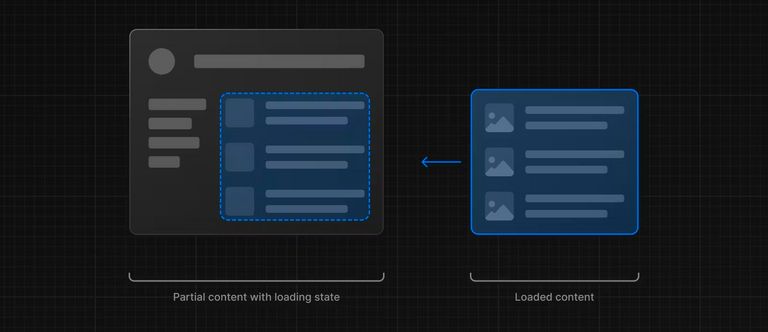
Streaming enables you to display loading states for layout parts and route segments that have blocking data requirements. Rather than delaying the page load until all data is ready on the server, the server can initially return a loading state for the dependent part and later replace it with the actual data once it is fetched from the server. This illustration from the Next.js streaming docs explains it really well:
Both Remix and Next.js 13 have good support for Streaming with Suspense.
Remix
With Remix, you can simply use the defer wrapper and return promises instead of resolved values for the items you want to stream from your loaders. Then in the component, you can use the Await component to handle deferred loader promises and wrap it in a Suspense boundary to display a loading indicator until the promise is resolved.
Here is a simplified version of how I used it in the Twitter Clone app, where I stream the first page of the infinite tweets from the server:
export const loader = async ({ request, params }: LoaderFunctionArgs) => {
  const username = params.username as string;

  return defer({
    tweets: getTweetsByUsername(request, username),
    currentLoggedInUser: await getCurrentLoggedInUser(request),
  });
};

export default function UserTweets = (
  props: SuspendedInfiniteTweetsProps
) => {
  const data = useLoaderData<typeof loader>();
  console.log(currentLoggedInUser.name)

  return (
    <Suspense fallback={<Spinner />}>
      <Await
        resolve={props.tweets}
        errorElement={<p>Something went wrong!</p>}
      >
        {(initialTweets) => (
          {/* Render the Tweets */}
        )}
      </Await>
    </Suspense>
  );
}
In the above example, also notice how the getCurrentLoggedInUser is awaited, so it would not be streamed, and you would be directly able to consume it like we were able to with normal loader responses.
Next.js
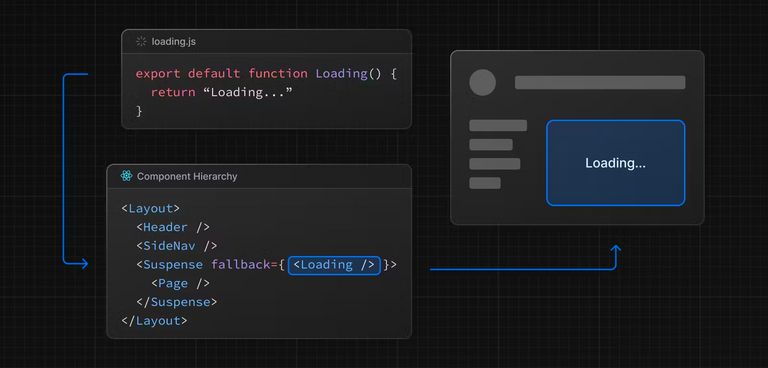
Streaming is even more straightforward with Next.js 13. As we discussed earlier in the layouts section, you can directly create a loading.tsx in your route segment directories to get instant loading states for the route segments underneath that directory.
Under the hood, Next.js wraps the page in the Route Segment within a Suspense boundary with the fallback you specified in loading.tsx. This is best illustrated in the following image from the Next.js docs.
Apart from this, if you want to Suspend something that is not a route segment, you can still do it by wrapping Suspense over an async component that has some data fetching requirements.
For instance, a good use for it in the Twitter Clone app was on the home page, where I wanted to suspend the initial tweets, but I didn’t want the user to wait for the “Create a Tweet” CTA in the header to be blocked because of it.
export default async function Home() {
  const user = await getCurrentLoggedInUser();

  return (
    <>
      {/** Header stuff */}
      {user && (
        <div className="hidden sm:flex p-4 border-b border-solid border-gray-700">
          <Image
            src={user.profileImage ?? DEFAULT_PROFILE_IMAGE}
            className="rounded-full object-contain max-h-[48px]"
            width={48}
            height={48}
            alt={`${user.username}'s avatar`}
          />
          <div className="flex-1 ml-3 mt-2">
            <CreateTweetHomePage />
          </div>
        </div>
      )}
      <Suspense fallback={<Spinner />}>
        <HomeTweets />
      </Suspense>
    </>
  );
}

async function HomeTweets() {
  const initialTweets = await getHomeTweets();

  return (
    /** Render initial infinite Tweets */
  );
}
Bottom line
Streaming with Suspense is a great feature in React that offers a great UX for the users by significantly reducing the time to first byte and showing an instant loading state while still keeping all the data fetching on the server.
Also, I really like how straightforward it is with React Server Components, where you can just wrap the component with blocking data fetching requirements in a Suspense boundary.
Data mutations
When it comes to mutations, we probably are all used to handling it ourselves by making API requests to a backend server and then updating the local state to reflect the changes, or even using libraries like React Query that help with handling most of the stuff for you. Both of the frameworks want to change that by making actions part of their core features.
In Remix, these are taken care of by actions, and at the time of writing this blog, Next.js also added Server actions with 13.4, but they are still in alpha.
Remix
In Remix, mutations are handled by actions, and they are one of the core features of Remix. Actions are defined in the route file by exporting a function called action. Similar to a loader, an action is also a server-only function from which you return a Fetch Response, but unlike a loader, it handles non-GET requests for the route (POST, PUT , PATCH, DELETE).
The primary way you interact with actions in remix is via HTML forms. Remember earlier when I mentioned that as you get better at the web, you get better at Remix? Well, this is the part where it is most evident. Remix encourages you to keep every part of your application where the user takes an action to be an HTML form. Yes, even the like button is a form.
Whenever the user triggers a form submission, it calls the action on the closest route in the context (you can modify that by specifying the URL you want to post your form to with the action attribute of forms). Once the action is executed, Remix refetches all the loaders for that route via the browser fetch request and refreshes your UI, which ensures that your UI always stays in sync with your database. This is called the “full-stack data flow” of Remix.
Let’s see how it works with some examples from the Twitter Clone. This is what the code for the Sign in page looks like
export const action = async ({ request }: ActionFunctionArgs) => {
  const form = await request.formData();
  const usernameOrEmail = form.get("usernameOrEmail")?.toString() ?? "";
  const password = form.get("password")?.toString() ?? "";

  const isUsername = !isEmail(usernameOrEmail);
  // Find an account
  const user = await prisma.user.findFirst({
    where: {
      [isUsername ? "username" : "email"]: usernameOrEmail,
    },
  });

  const fields = {
    usernameOrEmail,
    password,
  };

  if(!user) {
    return json({
      fields,
      fieldErrors: {
        usernameOrEmail: `No account found with the given ${
          isUsername ? "username" : "email"
        }`,
        password: null,
      },
    }, {
      status: 400
    })
  }

  const isPasswordCorrect = await comparePassword(password, user.passwordHash);

  if(!isPasswordCorrect) {
    return json({
      fields,
      fieldErrors: {
        usernameOrEmail: null,
        password: "Incorrect password",
      },
    }, {
      status: 400
    })
  }

  return createUserSession(user.id, "/");

}

export default function Signin() {
  const actionData = useActionData<typeof action>();
  const navigation = useNavigation();
  return (
    <>
      <h1 className="font-bold text-3xl text-white mb-7">Sign in to Twitter</h1>
      <Form method="post">
        <div className="flex flex-col gap-4 mb-8">
          <FloatingInput
            autoFocus
            label="Username or Email"
            id="usernameOrEmail"
            name="usernameOrEmail"
            placeholder="[email protected]"
            defaultValue={actionData?.fields?.usernameOrEmail ?? ""}
            error={actionData?.fieldErrors?.usernameOrEmail ?? undefined}
            aria-invalid={Boolean(actionData?.fieldErrors?.usernameOrEmail)}
            aria-errormessage={actionData?.fieldErrors?.usernameOrEmail ?? undefined}
          />
          <FloatingInput
            required
            label="Password"
            id="password"
            name="password"
            placeholder="********"
            type="password"
            defaultValue={actionData?.fields?.password ?? ""}
            error={actionData?.fieldErrors?.password ?? undefined}
            aria-invalid={Boolean(actionData?.fieldErrors?.password)}
            aria-errormessage={actionData?.fieldErrors?.password ?? undefined}
          />
        </div>
        <ButtonOrLink type="submit" size="large" stretch disabled={navigation.state === "submitting"}>
          Sign In
        </ButtonOrLink>
      </Form>
    </>
  );
}
For form submissions that require a URL change, Remix provides a Form component which is a progressively enhanced wrapper over the native HTML form element. You can then use the useNavigation hook that provides you with information about a pending page navigation which you can use to give feedback to users about loading states. For the Sign in page, we are using it to disable the button while the form is submitting.
Similar to useLoaderData we saw in loaders, Remix also provides useActionData, which acts as a bridge between server and client, providing feedback for notifying the users of any submission errors.
Also, notice we are not using any state for managing the inputs. Instead, we rely on the browser’s default behavior to serialize all the form fields in the body and “POST” it to the server when the form is submitted. In the action, we can then read the formData via the Fetch Request’s formData method.
But we don’t want to do navigations with form submissions every time. Hence Remix also offers another utility for interacting with forms without causing navigation called fetcher. Almost all the remaining forms in the Twitter Clone are fetcher forms. Let’s take liking a tweet on the status page as an example:
export default function TweetStatus() {
  const { tweet, user, replies } = useLoaderData<typeof loader>();
  const fetcher = useFetcher();
  const isLoading = fetcher.state !== "idle";

	return (
		{/** Rest of UI on page ,omitted for brevity **/}
		<fetcher.Form method="post">
      <input type="hidden" name="tweetId" value={originalTweetId} />
      <input
        type="hidden"
        name="hasLiked"
        value={(!tweet.hasLiked).toString()}
      />
      <TweetAction
        size="normal"
        type="like"
        active={tweet.hasLiked}
        disabled={isLoading}
        submit
        name="_action"
        value="toggle_tweet_like"
      />
    </fetcher.Form>
   {/** Rest of UI on page ,omitted for brevity **/}
	);
}

export const action = async ({ request }: ActionFunctionArgs) => {
  const formData = await request.formData();
  const action = formData.get("_action");
  const userId = await getUserSession(request);

  if (!userId) {
    return redirect("/signin", 302);
  }

  switch (action) {
    case "toggle_tweet_like":
      {
        const tweetId = formData.get("tweetId") as string;
        const hasLiked = formData.get("hasLiked") === "true";
        await toggleTweetLike({
          request,
          tweetId,
          hasLiked,
        });
      }
      break;
    case "toggle_tweet_retweet":
      {
        /** Handle tweet retweet **/
			}
      break;
    case "reply_to_tweet":
      {
        /** Handle tweet reply **/
      }
      break;
  }

  return json({ success: true });
};
Notice how we use hidden type inputs in the form for passing relevant data like the tweetId and hasLiked to the server. We are also setting the name of the button to _action and the value to toggle_tweet_like, this allows us on the server to identify what type of action was triggered, which is useful when you have multiple forms on your page.
Now as we saw in the full stack data flow, Remix will automatically run all the loaders on the page via the browser fetch, updating the UI on the page that was reading the data from the relevant loaders. So the tweet like count and the button state, automatically gets updated. Check out this video to see how it works:
My favorite part is since Remix forces you to use HTML forms everywhere and since browsers by default, serialize the form inputs, and send data to the server automatically, users can start interacting with the page before the JavaScript even loads. You can verify this by disabling JavaScript and then taking actions on almost any page in the app.
For instance here is an example from Sign in page where the form errors are shown even without JavaScript:
And another example of following a user from the user profile page:
Next.js
Prior to Next.js 13.4, the only way you could create and take actions on the server was by creating API routes. Any file created under pages/api was treated as an API endpoint instead of a normal page.
While it was a great solution for one-off API routes where you need to do some processing on the server, they were not a complete solution since you were on your own when it came to calling the API on the client side and making any revalidations.
That’s one of the reasons solutions like trpc became so popular, where they leveraged the Next.js’ API route system with React Query to handle API requests and mutations from the client side.
Next.js 13.4 introduced server actions, and at the time of writing this article, they are still in an experimental phase.
With server actions, you don’t need to create API endpoints. Instead, you can just create asynchronous server functions that can be directly called from your components, and have access to all the Next.js server-only utilities like cookies, revalidate, redirect, etc.
This tweet by Lee Robinson summarizes it really well as to how much less code you have to write with Server Actions:
How is this not illegal pic.twitter.com/TieLpPotYS
— Lee Robinson (@leeerob) May 19, 2023
If you are in a Server Component, you can define a Server Action inside a component by placing 'use server' on the first line and then either use it with a form by directly passing it to the action prop of form or by passing it to a client component. (When action prop is used in Server Components, the form works without JavaScript)
export default async function Page() {
	async function createTodo(formData: FormData) {
    'use server'
    // This will be executed on the server
  }

  return <form action={createTodo}>...</form>
  // or
  return <ClientComponent createTodo={createTodo} />
}
You can also create a separate file with the 'use server' directive at at top of the file, and all the functions exported from that file can be used as server actions and can be directly imported into client components.
'use server'

export async function doStuff() {
  // This will be executed on the server
}
'use client'
import { doStuff } from './actions';
export default function Button() {
return (
<form action={doStuff}>
<button type="submit">Do stuff</button>
</form>
)
}When using the action attribute on Client Components, the action will be placed in a queue until the form has hydrated. The <form> is prioritized with Selective Hydration, so it happens as soon as possible.
Let’s look at some examples from the Next.js Twitter Clone. This is how the code for Sign in page looks like:
export default function Signin({
  searchParams,
}: {
  searchParams: Record<string, string>;
}) {
  const signin = async (formData: FormData) => {
    "use server";
    const auth = {
      usernameOrEmail: formData.get("usernameOrEmail")?.toString() ?? "",
      password: formData.get("password")?.toString() ?? "",
    };
    const isUsername = !isEmail(auth.usernameOrEmail);
    // Find an account
    const user = await prisma.user.findFirst({
      where: {
        [isUsername ? "username" : "email"]: auth.usernameOrEmail,
      },
    });

    if (!user) {
      const error = encodeValueAndErrors({
        fieldErrors: {
          usernameOrEmail: `No account found with the given ${
            isUsername ? "username" : "email"
          }`,
        },
        fieldValues: auth,
      });
      return redirect(`/signin?${error}`);
    }

    // Compare password
    const isPasswordCorrect = await comparePassword(
      auth.password,
      user.passwordHash
    );

    if (!isPasswordCorrect) {
      const error = encodeValueAndErrors({
        fieldErrors: {
          password: "Incorrect password",
        },
        fieldValues: auth,
      });
      return redirect(`/signin?${error}`);
    }

    // Set auth cookie
    setAuthCookie({
      userId: user.id,
    });
    return redirect("/");
  };

  const { fieldErrors, fieldValues } = decodeValueAndErrors({
    fieldErrors: searchParams.fieldErrors,
    fieldValues: searchParams.fieldValues,
  });

  return (
    <>
      <h1 className="font-bold text-3xl text-white mb-7">Sign in to Twitter</h1>
      <form action={signin}>
        <div className="flex flex-col gap-4 mb-8">
          <FloatingInput
            autoFocus
            label="Username or Email"
            id="usernameOrEmail"
            name="usernameOrEmail"
            placeholder="[email protected]"
            defaultValue={fieldValues?.usernameOrEmail}
            error={fieldErrors?.usernameOrEmail}
            aria-invalid={Boolean(fieldErrors?.usernameOrEmail)}
            aria-errormessage={fieldErrors?.usernameOrEmail ?? undefined}
          />
          <FloatingInput
            required
            label="Password"
            id="password"
            name="password"
            placeholder="********"
            type="password"
            defaultValue={fieldValues?.password}
            error={fieldErrors?.password}
            aria-invalid={Boolean(fieldErrors?.password)}
            aria-errormessage={fieldErrors?.password ?? undefined}
          />
        </div>
        <SubmitButton>Sign In</SubmitButton>
      </form>
    </>
  );
}
Although, as of now, there is no declarative way like Remix’s useActionData to read the response from the server action, and for the Sign in page, I wanted a way for the user to show the error without JavaScript, so I used search parameters to encode and decode field values and errors.
The SubmitButton here is a client component that uses an experimental hook called useFormStatus to show the disabled state while the form is submitting.
"use client";
import { experimental_useFormStatus as useFormStatus } from "react-dom";
import { ButtonOrLink } from "components/ButtonOrLink";

export const SubmitButton = ({ children }: { children?: React.ReactNode; }) => {
  const { pending } = useFormStatus();

  return (
    <ButtonOrLink
      type="submit"
      size="large"
      disabled={pending}
    >
      {children ?? "Submit"}
    </ButtonOrLink>
  );
};
On the client side, you can also use the startTransition API to execute server actions that do server mutations (call revalidatePath, redirect, or revalidateTag ) and execute the server action directly on button click, for instance, check out how it is implemented for the Follow button:
const [isPending, startTransition] = React.useTransition();

<ButtonOrLink
  disabled={isPending}
  onClick={() => {
    startTransition(async () => {
      await toggleFollowUser({ userId: profileUserId, isFollowing: true });
    });
  }}
  variant="secondary"
>
  Follow
</ButtonOrLink>
Similar to Remix, you can directly revalidate paths from server actions which would cause the server components to be invalidated, and the UI would reflect the updates automatically. Although unlike Remix you have to manually call the revalidatePath to refresh the data for that particular path.
export const toggleFollowUser = async ({
  userId,
  isFollowing,
}: {
  userId: string;
  isFollowing: boolean;
}) => {
  /* Updating the value in DB, omitted for brevity */
  revalidatePath("/[username]");
};
Here is a demo of how the following state is automatically updated on the profile page with the revalidatePath when the user clicks on the follow button:
Bottom Line
To be fair, I really like Remix’s approach of actions of how it completes its full-stack data flow by automatically refetching the loaders and updating the UI, also making your app work even before the JavaScript has loaded, improving not only the user experience but also the developer experience significantly.
But actions also have a caveat, which is the same that we saw with loaders, that they can only be defined in route segments. If you want to reuse an action at multiple places, have to do it by specifying the URL of the action in the form's action attribute. This can get confusing as your app grows because you have to find the file that executes the action based on the value provided in the action prop. For an example you can check out how I had to use it for create tweet action, where it is being used at two places, one on the home page and the other with the tweet modal.
Next.js’ server actions solve the above problems by allowing you just to create functions that can be called from anywhere inside your app just by importing them. However, at the moment, they lack the good form support and automatic revalidation that Remix has and also feel pretty unstable and under-documented at the moment. I had to open a couple of discussions in Next.js to understand how the API works.
Infinite Loading
Infinite loading with infinite scrolling was an interesting problem because neither of the frameworks has first-class support for it, yet it was a very important part of the Twitter Clone app since it was there on almost every page.
As you need to handle infinite loading on the client side, I had to manage the state for them on the client itself via a useReducer. I had a pretty interesting experience adding it to both of them, so I thought this deserved a separate section of it.
Remix
The infinite scroll implementation was heavily inspired by this article called Full Stack Components by Kent C Dodds. It was in this article that I learned about resource routes and how powerful they are in Remix.
The concept is that you create a route similar to a normal route module, but if you don’t export a default component from that route, you can still use the loaders and actions defined in that route via GET and POST requests. They almost act like Next.js’ version of API routes.
So for Remix, I created a new route called routes/resource-infinite-tweets.tsx, which had a named export for InfiniteTweets. Since this was not a default export, Remix won’t render any UI for this route. This named export was used in all the components that had infinite loading tweets.
I won’t go into much detail about how the component worked; you can check out the relevant code for it on GitHub. In short, I used the IntersectionObserver API to detect the end of the page and triggered a request to fetch the next page of tweets, which were then added to the reducer. All the other states including like/retweet/reply counts, are also stored in the reducer.
Let’s take an example of one of the pages this component was used in: the user tweets page. The first page of the tweets is loaded on the server and is streamed to the client, as we saw in the streaming section. But for the next page onwards, we use the loader defined in the resource-infinite-tweets.tsx, which looks something like this:
export const loader = async ({ request }: LoaderFunctionArgs) => {
  const cursor = getSearchParam(request.url, "cursor") ?? undefined;
  const type = getSearchParam(request.url, "type") as InfiniteTweetType;
  const username = getSearchParam(request.url, "username");
  const tweetId = getSearchParam(request.url, "tweetId");

  let tweets: Array<TweetWithMeta> = [];
  switch (type) {
    case "user_tweets":
      tweets = await getTweetsByUsername(request, username as string, cursor);
      break;
    case "home_timeline":
      tweets = await getHomeTweets(request, cursor);
      break;
    case "tweet_replies":
      tweets = await getTweetReplies(request, tweetId as string, cursor);
      break;
    case "user_replies":
      tweets = await getUserReplies(request, username as string, cursor);
      break;
    case "user_likes":
      tweets = await getUserLikes(request, username as string, cursor);
      break;
  }

  return json(
    {
      tweets,
    },
    200
  );
};
Now to trigger the loader, we use the fetcher that we saw in the data mutations section. It also has a method called submit that allows us to programmatically trigger a GET request to the loader, which fetches the next batch of tweets.
React.useEffect(() => {
    if (isLoading || isLastPage || !isVisible || !shouldFetch) {
      return;
    }
    fetcher.submit(
      {
        type,
        cursor: lastTweetId,
        ...rest,
      },
      {
        method: "GET",
        action: "/resource/infinite-tweets",
      }
    );
    setShouldFetch(false);

  }, [
    isVisible,
    lastTweetId,
    isLoading,
    isLastPage,
    type,
    shouldFetch,
		rest,
    fetcher
  ]);
This effect is triggered when specific conditions are met that indicate that the page needs to be fetched. The data is then made available in fetcher.data which is added to the reducer in another effect.
React.useEffect(() => {
  if (fetcher.data && Array.isArray(fetcher.data.tweets)) {
    dispatch({
      type: "add_tweets",
      newTweets: mapToTweet(fetcher.data.tweets, isLoggedIn),
    });
    setShouldFetch(true);
  }
}, [fetcher.data, isLoggedIn]);
This route module has an action as well, which handles all the liking/retweeting/replies for the tweets, which use the same code with fetcher.Form that we saw in the data mutations section.
Next.js
The implementation in Next.js is also very similar to Remix, the main differences are InfiniteTweets is a client component, and we use server actions for loading the next set of pages.
Similar to Remix, the first page of the tweets is streamed from the server. The loading.tsx file that we saw in the streaming section comes in really handy here. We just add this file in all the tabs for the profile page, and Next.js takes care of the pages in Suspense boundaries.
Here is what the code for the user tweets page looks like:
export default async function Profile({
  params: { username },
}: {
  params: { username: string };
}) {
  const [tweets, currentLoggedInUser] = await Promise.all([
    getTweetsByUsername(username),
    getCurrentLoggedInUser(),
  ]);

  const fetchNextUserTweetsPage = async (cursor: string) => {
    "use server";
    const tweets = await getTweetsByUsername(username, cursor);
    return tweets;
  };

  return (
    <>
      {/** Tweets */}
      <div>
        <InfiniteTweets
          initialTweets={tweets}
          currentLoggedInUser={
            currentLoggedInUser
              ? {
                  id: currentLoggedInUser.id,
                  username: currentLoggedInUser.username,
                  name: currentLoggedInUser.name ?? undefined,
                  profileImage: currentLoggedInUser.profileImage,
                }
              : undefined
          }
          fetchNextPage={fetchNextUserTweetsPage}
          isUserProfile
        />
      </div>
    </>
  );
}
Notice how we are creating a server action called fetchNextUserTweetsPage and passing it to the InfiniteTweets component. This component then fetches the next page of the tweets by calling the action passed via this prop.
React.useEffect(() => {
  const updateTweets = async () => {
    if (isLoading || isLastPage) {
      return;
    }
    setIsLoading(true);
    const nextTweets = await fetchNextPage(lastTweetId);
    setIsLoading(false);
    dispatch({
      type: "add_tweets",
      newTweetsRemixToTweet(nextTweets, isLoggedIn),
    });
  };
  if (isVisible) {
    updateTweets();
  }
}, [isVisible, lastTweetId, isLoading, isLastPage, fetchNextPage, isLoggedIn]);
Then similar to Remix, we add the data to the reducer, which renders the next set of tweets on the page.
Bottom line
Infinite loading was the only part in both frameworks where I had to manage the state of the tweets on the client side.
This is the part where the composability aspect of Server Actions really shines in Next.js 13. I just had to fetch the first page in the the Server Component that would be streamed and then create a Server Action for fetching the next pages in the component itself which was directly passed to the client component.
In Remix, although the fetcher and resource route did make fetching data easier but then we also had to create a separate loader for each route to streamed the first page for the infinite tweets.
Either way, the solution was not perfect in both of them and in general, I would have preferred a solution that libraries like React Query offer with their useInfiniteQuery hook, which helps you manage invalidations and optimistic updates on the client side really well for infinite queries like this.
Other features
Both of these frameworks have a bunch of other useful features as which include:
Routing
Both Remix and Next.js have a very powerful client-side router, which instead of doing a full page reload and doing a round trip to the server to fetch the full document, they just update the UI, re-rendering only the route segments that change.
Next.js detects the routes that need to be prefetched in the background for all the <Link/> tags visible in the viewport. For dynamic routes, the shared layout down until the first loading.tsx file is prefetched and cached for 30s. This allows you to show an instant loading state as soon as the user clicks on the route.
Remix goes one step further with the prefetch attribute, allowing you to specify different values based on your use case. My favorite one is intent which fetches not only all the JavaScript bundles but also all the data necessary for the next route via <link rel="prefetch"> tags when you hover on the link. This allows you to render the next page almost instantaneously.
Error Handling
Both of the frameworks have first-class support for handling both expected and unexpected errors globally and inside every route segment.
In Remix, similar to loader and action, you can export ErrorBoundary which renders the error state for that route segment. It handles both unexpected errors that might occur on the server or in the browser and expected errors like 404. To catch an expected error, you can throw a Response from your loaders. For an example, check out the 404 state for the user profile page.
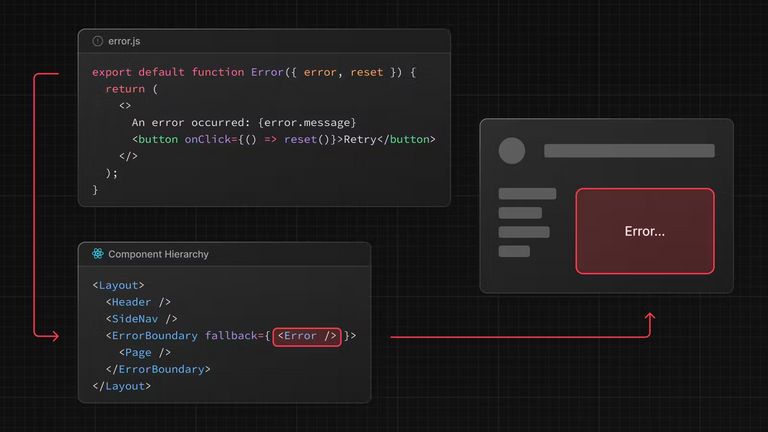
In Next.js, again, you have separate files in each route segment for rendering the error state for that route. error.tsx is meant to specifically handle any browser or server errors that occur in the route segment. It wraps an ErrorBoundary over your route segment, similar to how we saw the Suspense boundary with loading.tsx. Again this is nicely illustrated via this image from the Next.js docs:
For handling 404s, Next.js has a specific file called not-found.tsx for every route segment. These are triggered by returning the notFound utility function within your server components. Again you can check out the not-found.tsx file for the user profile page of the Next.js Twitter Clone.
Caching
For the Twitter Clone app, there wasn’t much use of caching and static rendering since all the route segments needed to use the user’s cookies to fetch data related to the user.
Next.js has improved the caching support significantly, where they have different layers of caching that allow you to cache not only the rendered routes but also the responses for fetch requests on the edge. You can read about it in much more detail in Next.js’ Caching docs.
Remix doesn’t have any opinion about caching, and since it simply speaks HTTP, you can just simply use Cache-Control headers to cache responses on the edge and in the browser, or you can use other server side caching solutions like Redis.
Conclusion
If you made it this far, then I hope you enjoyed reading the blog, you had some interesting takeaways for either of the frameworks that help making you a better decision when building your next full-stack app.
In conclusion, building complex full-stack web applications in React has never been this faster and easier, thanks to both of these frameworks. As for me, I really loved how Remix has built a framework that leverages the fundamental Web APIs and offers you a simple yet powerful way of building modern web apps. Meanwhile, the app directory in Next.js just blows my mind with how React Server Components and Server Actions allow you to compose and create full-stack components while shipping a deterministic bundle size to the browser. Really excited about what the future holds for both frameworks.